當你程式都已經寫完、部屬到伺服器,
而且連網域都買好交由Cloudflare託管時,才發現App Service所需的是pfx憑證,
卻苦惱不知道該如何產製pfx憑證。
此篇文章將教你如何利用cloudflare提供的私密金鑰產製一個pfx憑證
所需工具:
- Cloudflare帳號
- git版控軟體
- 安裝後依安裝路徑找到git底下的bin資料夾(C:\Program Files\Git\bin)並設至電腦「環境變數」後,重新開機。
- Azure App Service
操作流程:
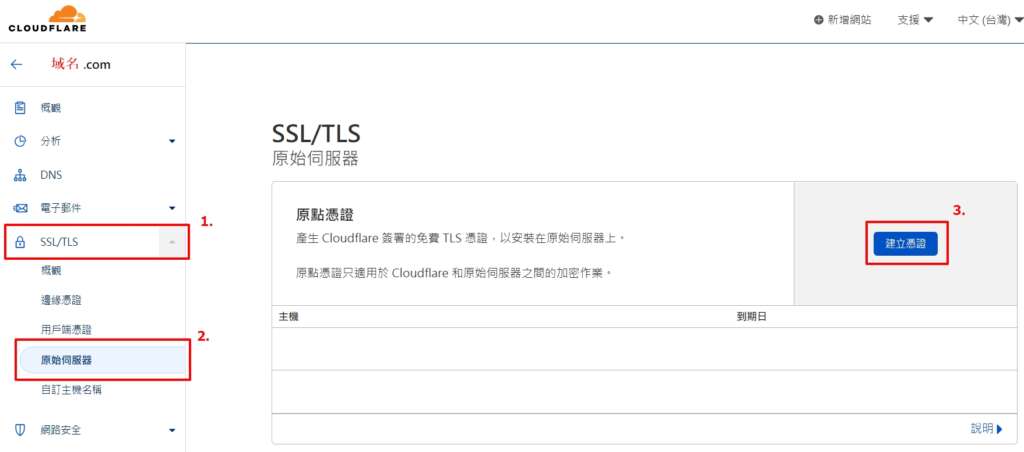
1.進入Cloudflare > 域名 > SSL/TLS > 原始伺服器。
2.點選建立憑證。
3.使用 Cloudflare 產生私密金鑰和 CSR私密金鑰類型 — 選擇 RSA(2048) 並建立。

4.產製PEM檔案:

- 金鑰格式選擇PEM
- 將原點憑證內容產生成cert.pem檔案(之後會用到)
- 將私密金鑰內容產生成key.pem檔案(之後會用到)
並將產生2個pem檔案放置同一個資料夾中。
5.用cmd 移至pem檔案放置位子

6.輸入指令
openssl pkcs12 -export -out Cert.pfx -in cert.pem -inkey key.pem -passin pass:helloworld -passout pass:helloworld


取得Cert.pfx檔案
7.上傳憑證至Azure
- 點選「攜帶您自己的憑證(.pfx)」
- 點選「新增憑證」
- 選擇來源「上傳憑證(.pfx)」
- 選擇pfx檔案
- 輸入「憑證密碼」 —> 剛剛轉換pfx輸入的helloworld

8.完成以後點選「驗證」即可。
If you have any questions, you can leave a message below or contact us through our Facebook fan page. I will replay you as soon as possible, thank you!
Please share, if you think this article is helpful.
如果有任何問題,歡迎至下方留言或是至粉絲專業與我們聯繫。
我會盡快回復你的問題,謝謝!
如果你覺得這篇文章不錯,歡迎分享!!
謝謝大大分享~這篇文章很有幫助
謝謝!你的支持是我繼續下去的動力